Thursday, October 29, 2009

Project Overview

Oops. I've been so closely tied to this project that I forgot some people don't know all the things we're doing. We bought our 1825 two family back in April 1999. We always planned to buy a 2 family that was originally a single and would be easy to convert back to a single. I wanted a Victorian with natural woodwork but they were $200K - $300K more money. We ended up with an 1825 Federal period home that was a structurally sound but cosmetically challenged two family. We had the wallpaper stripped and then all the walls needed to be skimcoated, floors refinished, all the ceilings repaired, reglazed the 30 six over six windows on the 2nd floor, updated electrical panel to two 100A circuit breaker service, updated some electrical to include wall switches (!) and painted everything. We rented downstairs and lived upstairs.

Our kitchen had red counters and white counters, old cabinets, the frig in the middle of the room, no dishwasher and 2 radiators taking up space. We updated our heating to central air and heat and bought the lowest end Home Depot kitchen for $2k (cabinets, counters, sink, faucet, etc.) thinking that this was a temporary (4 year) fix. It was a huge improvement.

We finished half the attic into a guest room/play room and added a bathroom (shower only). Then we lived in CA for 16 months, the UK for 6 months and traveled extensively. When we got back we started detail planning. This took years.

We're now converting the house back to the original single family. I want to respect the house and keep as much of the original fabric as possible but still have it for modern living. I see us as caretakers for this home. Some contractors and architects wanted me to blow out all the walls and gut the house. If I wanted a modern house I would have bought one. We're keeping as much of the original footprint as possible.

These are our present projects:
  • gutting 2 baths (and moving one wall)
  • taking out one non original staircase and adding one where the original staircase was located
  • moving a few doorways for better flow
  • gutting the kitchen and adding 8 feet out the back with a half bath
  • adding a mudroom
  • updating ALL the electrical and plumbing (some of my pipes are the original from 1877 when they brought in the sewer lines and lots of knob and tube wiring)
  • lots of structural work mainly in the basement
  • lining a few fireplaces
  • adding a home automation system
  • roughing in the guest bath (we'll do the finish work ourselves)
  • refinishing the the wood floors on the 1st level
  • new heating system on 1st floor
  • adding central air to 1st floor
  • plus a few other things like wall light switches (!), ceiling lights in rooms that have none (!), etc. - you know, some of those modern conveniences most people enjoy today.

I'm reglazing, repairing and repainting the 30 1st floor 6 over 6 windows (John's helping), stripping woodwork, painting the whole house, buying all items like lights (30), plumbing fixtures, caninets, doors (custom and stock), pillars, staircase parts (lots of research) etc. coordinating my contractor with MY subs (window repair, HVAC, floor guy, roofer, etc). I've been working with an architect since 3/08.

Presently, our addition framing is almost done (waiting for a door) and most of the demo is finished on the 1st floor. (We're living on the 2nd floor). The plumbing and electrician will rough in the 1st floor over the next few weeks and then the contractor will break thru to our floor after Thanksgiving. He will then go gun-ho until finished. He expects to be done Jan/Feb.

My scanner isn't the greatest and most of these drawings are on 11 x14 pages but you will get the idea. Here are the updates to the 1st floor. The kitchen is chopped off but it's included in the kitchen blog. The staircase is moving back to the center of the house. The study in the bottom right is the billiards room where the "new" fireplace is located. You can see a little bit of our mudroom at the bottom right - right of the basement stairs. The top of the picture is south.


Here's the 2nd floor updates. Bedroom 2 is getting a walkin closet from the old staircase. Also a linen closet will be carved out of the space in the hall. The large closet from bedroom 2 will be used in the bathroom so we can move the washer and dryer into it and add a shower. (the washer and dryer are in the present 2nd floor pantry which will be the future guest bathroom). The unnamed room on the left in the middle is our present dining room. In phase III it will become our master bath. The space just above it in this drawing will become our walk in closet.


Here's how the front of the house will look when we're done. The new mudroom addition is immediately to the right of the garage. I cannot wait for our 6' x 12' mudroom! This part of the house is facing the street and west.

Here's a drawing on how the back of the house will look. The garage is to the right and off picture. The new 1st floor kitchen addition is on the right side of the picture. The small window is in the new half bath. This wall of the house is facing east.

This view is from the north side of our property line looking south onto our garage. To the left is the 8' kitchen half bath bump out. To the right of the garage is the new mudroom. These walls of the house are facing north.
This will give you an idea on some of our electrical updates on the 1st floor. Notice all those new wall switches - there's only 3 in the 1st floor now!! Some of the rooms don't have ceiling lights.

We're also planning a full backyard renovation with inground pool. I'm working with a historic landscape designer and want to use plants from the 1850's or earlier. She designs period gardens for modern living. We hope to have the pool in by late spring. Kitchen is my main focus but I have a lot of other things going on. And renovating a very old house there are many surprises in the walls. I'm still holding out for gold in the walls.

Phase II will be finishing the guest room suite in our present kitchen and adding a wine cellar in the basement. We expect to do most of the work ourselves.

Phase III (when we have more money) will be to complete our master bedroom suite. We will convert our present dining room into our master bath and convert our office into a walk in closet.

I think we have enough to fill our time (and take all our money).

Wednesday, October 28, 2009

Searching for a staircase

So, our plans call for removing the 1910's staircase to the 2nd floor and putting in the original staircase. Normally one enters the foyer with the steps either on the right or left that go up to the 2nd floor. This is what we want to do. Our house was built before indoor plumbing so the present bathroom did not exist at that time. There's not enough room at the 2nd floor landing for the staircase. The steps will not fit if it's to meet code. To make it work we're going to put them in reverse order. When you walk into the foyer a coat closet will be in front of you. The stairs to the 2nd floor will start near the bathroom. In this rendition we don't have to reverse the stairs to the 3rd floor.

In the below picture the 2 bathrooms are on the left - one on each floor and both will be gutted. The entrance to the foyer is on the 1st floor to the far right.


I never found anything in the house on what the original staircase looked like. Now I had to do my research. Asher Benjamin is a famous architect from the early 1800's. His pattern books provide drawings and practical advice for full house plans, including such details as circular staircases, doorways, fireplace mantels, balusters, etc. Many drawings were full scale. People used these books to build houses. Our library had copies of most of his books. I copied many useful pages. I also found a book at the library on Federal Homes with drawings for woodwork, windows, etc. Not too much on stairs but helpful for other things. The moulding most similar to ours is in a house 3 miles away - the Gore estate. I went over to look at their stair baluster - very plain. I also have the "The Elements of Style" - excellent resource for period homes.

Next I searched the Library of Congress Historic American Buildings Survey (HABS) http://memory.loc.gov/ammem/collections/habs_haer/index.html This is a treasure trove of information. "Administered since 1933 through cooperative agreements with the National Park Service, the Library of Congress, and the private sector, ongoing programs of the National Park Service have recorded America's built environment in multiformat surveys comprising more than 556,900 measured drawings, large-format photographs, and written histories for more than 38,600 historic structures and sites dating from Pre-Columbian times to the twentieth century." I thought I read many years ago that this program was started by FDR to get people back to work in the Great Depression.

In this database I can type in a date and "baluster" and get lots of pictures for stairs for that date. I can also search by state, county and then city. I looked at old houses in Newton, Cambridge, Boston and the North Shore. I found many examples. From all of this I'm searching stair books to find something similar. Yes, I could go custom but it will be very, very expensive. Instead, I would like to find something that would appear to most people that it would fit for the period. I think I'm getting close to a decision.

Tuesday, October 27, 2009

Found a fireplace

September 23, 2009

Well, we knew there was probably a fireplace in the wall in the room under Sean's bedroom. This will be our billiard room. Our contractor took a look and low and behold - there it was. It was bricked up. I think the old furnace was vented thru here. (the other fireplace on this floor is bricked up too but we will open it for a gas insert.) Our furnace and the new 1st floor furnace will be vented directly outside. The fireplace has a brick face - not plaster. Mike thinks this is how it was originally. This is very different from the others. Maybe this is where the original kitchen was located? We're going to expose this fireplace - do we leave the brick exposed too or plaster it up? We need a mantle also.
Here's the fireplace in the TV room. We will open this up, put in a flue and add a gas insert. This is a marble mantle,
Another marble fireplace - this one will be in the sitting room. We will only use candles in it.A close up of this fireplace.The 4th firplace on this floor. The marble mantle is painted - I need to figure how to get the paint off and not ruin the stone underneath. Any suggestions?

Granite and kitchen layout

Granite - I wanted a "WOW" granite. I visited over 10 granite yards multiple times and was contantly pulled towards Typhoon Bordeaux. I wanted some red, lots of movement and not too dark. Here's a picture of our slab (we have two). We picked it out on my way to the airport to Ireland for 10 days.

Kitchen - I've been thinking about it a long time. Here's a "before" picure. I worked with my architect, got some suggestions from a few kitchen designers and then the final configuration from Garden Web people. I'm very happy with it. We will have a 48" red Blue Star 6 burner plus grill range, 2 dishwashers, 30" farmhouse sink, prep sink in the island, french door frig and an undercounter frig. I also have a big walk in pantry. We have a big island, built in benches around table and a lunch/sandwich area to the right of the frig. I was worry that it would be dark because all the cabinets are at the end with no windows but it isn't the case. (Click on the diagram and it will be larger).


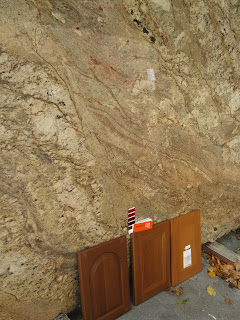
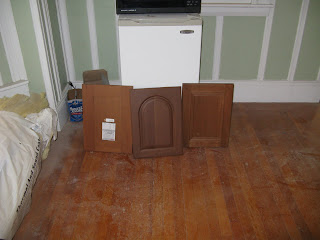
If you have any recommendations I'm all ears. I hope to order cabinets this week or next. I'm getting Cabico cherry cabinets in a natural stain. I'm not sure what color. I also want a red stove. I was looking at the top color on the left, top 2 colors in the middle and bottom color on the right. I love the last color but it's "too" red and doesn't go with the granite as well as the others. The 1st one was the best "match" but too brown for me. I'm going with the top color in the middle.

Next I have to pick out a cabinet stain. This was my 2nd round of choices out of 30+ stains. I love the dark one but the red stove gets lost in it and the white refrigerator will look too stark. We already bought the frig since ours died last May.


I then narrowed it down to these 3. Which do you like?


Here they are in the kitchen.

Here are the cabinets in the dining room on the natural oak floor. I'm hoping to have the same in the kitchen. The only "catch" is if I go with reclaimed wood - not sure what that would be or look like.

Gutted entrance hall

Here's our gutted entrance hall. This is looking at our new entrance, south.
The main support beams are 10 x 10 but the other ones are undersized. More support added.
The new staircase has to go thru the 10 x 10 beam. Before Mike would cut it he wanted to make sure all is OK. Both the architect and structural engineer came out to look at it. All is fine.

We found some very old wallpaper behind our present stairs to the 2nd floor. It was probably from the late 1800's. We found some more behind wood trim too.

Foundation and cement truck 9/10 and 9/11

OK, this is not quite in order. This work was some of the 1st to be done (9/9 and 9/10) but I'm playing catch-up with my Blog. It's also my 1st time blogging and I'm learning as I'm going. I know the pages will get "prettier" as I go along. Here are some pictures of foundation work. The cement walk way was broken up by by Bruno with a sledgehammer. Bruno's a small guy.

The foundation was dug out with a back hoe. Here's the mud room foundation hole.

Here's the kitchen and half bath foundation hole. There will be a crawl space under here.

Mike our contractor directing the cement truck onto our lawn.

Hayden was here the 1st time the cement truck arrived.

Gutted 1st floor kitchen

The kitchen morphed into a shell over time. This 1st picture is the east wall down to the studs. This wall be removed and a new frame will be built 8 feet further into the backyard.


This corner had the old stove. We think this addition is between 1840 - 1860. Notice the vent for the stove that went into the chimney. We decided to keep the half brick wall and the brick on the floor. Some of it will be covered by the new cabinets and stove.

Framing is going up on the back side of the east wall. Part of the wall is being removed.

The new kitchen addition waiting for windows and door.The gutted kitchen looking west. The wall to the left of the door will hold 2 cabinets and my stove.Windows and door are in. I was afraid there wasn't going to be enough natural light - but I was wrong.

Gutted 1st floor bathroom

Here's pictures of our 1st floor bath.


Notice where the rear door use to be on the outside wall? It's only a single layer of brick now (where the window is located). Lots of knob and tube wiring too. We decided to update all the electrical. We're switching the sink and toilet layout so the sink is the 1st thing you see when you walk into the bathroom. We're using our old sink from Watertown - square stone one with open faucet. We will have the old claw foot tub reglazed and open up to the room. Just a hand held shower with no curtain. The tub will be mainly used for soaking.

Painted wood floor above kitchen ceiling


September 11, 2009

Ok, I've been talked out of the old wood floors in the main part of the house because our beautiful oak and fir on top will have left a lot of nail holes, the floors are too soft, the floors would be different levels, "there's a reason they covered it", etc. but...a new saga. Still no gold in the walls.
Both kitchens have 8' ceilings compared to 9'4" in the rest of the house. The floors are all level so there is "room" between the 2 kitchens - specifically 16". Mike our contractor wanted to see what's in there because we need to order windows and the plans call for full height kitchen. He was hoping a drop ceiling and no pipes. Trying to cut thru the ceiling was a bear - no drop ceiling here. Mike says it looks like another floor. Huh? His saw is having a difficult time. Well it appears to be 2 layers of 3/4" flooring just like the main part of the house (old growth pine?). I think we have a very nice old floor without nail holes. It doesn't look hand planed but maybe from the 1840's. We know the addition was there before 1877 when city sewer was hooked up to the house per the old city connection plans that year. The floor is painted too like the old part of the house. Since it's on the 2nd floor it would not have gotten much use and nothing on top of it so no nail holes.

I asked Mike if he's ripping up the ceiling today. He said no (he's getting the footings in for the mudroom today - a full size cement mixer was in our back yard yesterday). I told him I may want to keep that old floor. He said only a midget could get it up. Well, I'm the ideas person and John is the implementer. John's cringing right now reading this. We got the weekend to think how to attack it. I'm not sure what I'm going to do with the old floor but it will not be in the dumpster!


All ideas appreciated.

Well, John spent part of Saturday trying to figure out how to get the floor boards out easily. He had to cut a larger hole to get a better look. On Sunday my brother-in-law Jeremy and a good friend Eugene helped John bring down the 2 layers of old pine (plus insulation, old mice droppings and 100 years of dust). Eugene came up with an even better idea on how to get whole pieces simply down. They guys got all the boards out in 4 - 5 hours. I spent the afternoon taking out the old sqaure nails. At some point I may make a sculpture out of them. I'm not sure what to do with the old floor but it's not in the dumpster. Maybe they will go down on our bedroom when we start phase 3.

Applied for permit

September 2, 2009

Yesterday I met my contractor to apply for our permit. Just to get to this point has been a rough 6 months. We were pursuing a special permit but the aldermen finally voted a band-aid to fix their screw up for FAR (floor area ratio). Well, yesterday was 9/1 (move in day and John and I spent all day cleaning our college apt for the next 5 male college students to move in). It was also the 1st day we could apply for our permit with the new fix. I came from scrubbing gross bathrooms and a kitchen. Mike, our contractor was going to be 15 min late - stuck in traffic. I asked him if I needed my checkbook for the permit. "Only if we get it today". No one thought THAT would happen. It would take 2 - 3 days if we were lucky and how my luck's been I thought it was going to take another 2+ months! Since I had the extra 15 minutes I dashed home to get it anyway.

At the counter was Al, an inspector Mike has used MANY times. (Another reason I picked my contractor - he's done lots of work in Newton). If Mike was alone, the permit would not have been given. Since I was there and could answer many questions we got the permit! It took 20 minutes. I wanted to FRAME the permit - not just tape it to the window. I was SOOOO happy. We started planning this project the day our offer was accepted 10.5 years ago. I went looking for an architect almost 2 years ago. I've been working with our architect for 1.5 years. We've been stuck in zoning purgatory for almost 3 months. It has been a LONG journey and we haven't even started the "hard" work.

Well, Mike wanted to start in the basement - we need about $20K of structural work. First the old radiator pipes need to be removed (10 radiators so 20 pipes). We're getting a new central heat and air system. Since we knew we had to do this no matter what (and we could split the permit in 2 if we really had to) I had my HVAC contractor take out the pipes ahead of time. (Actually, he drained the system last June when we thought for sure we would get a permit and took out the pipes the last 2 days). I walked thru with Greg (HVAC guy) where the returns and registers would go on Mon. I said I wanted to run it by John . There were a few up in the air. He asked when he could start. I said I would like it done by mid Oct so we have heat down there but he could start sooner. After the pipes he was going to send someone over to take out the radiators. He was doing a job near by and could send some guys over during their down time on that job. I said I was flexible.

Well, last night I was so excited and couldn't get to sleep until almost 3 am. So much going thru my head - so many decisions! At 8 am our doorbell rings. A guy wanted to talk to me about some stuff downstairs. They're taking out the radiators and 2 are enclosed. They may have to saw it apart to get at them. I said let it rip. He then asked me where I wanted the heating grates in the kitchen - they were not marked. WHAT!?!? 8 am and most of the grates have been already cut in the floor - including one where it definitely wasn't going. If I was there some would be moved a few inches. I told the guy - no more holes in the floor!!!! We called Greg, my HVAC contractor. Greg said since he didn't hear from me that he thought all the locations were OK. It was only a little more than a day! From now on if a decision has to be made, no one can precede until they get my OK. I didn't think they were going to cut holes in the floor for a few weeks. I now may have a few patches in the floor. There would be some for the holes from the radiators pipes. Take a big breath - I will live. I told them to keep all the wood they sawed out of the floors. I inspected some. I thought they put the present floors over the old floors. Now I could see for sure.

There were 3 floors. Our oak and fir wood floors (from 1910's), the original floors (1825) and a subfloor. Now another major decision. Do I pull up the beautiful wood floor to show off the original 1825 hand planed painted grey floor? You would not believe how dense that wood is! It's 3/4 inch thick. There's an old fashion square nail in it. I'm thinking about exposing the old floors in a few rooms. At least this decision doesn't need to be made for a few weeks. What do you think? Really - tell me your opinion. All comments welcome! I'm also going with wood floors in the kitchen. They may not have the old hand planed floors since it was built in the 1870's (we think). They may have the oak floors and I could use the pulled up oak for patches. (This is my economical side thinking). What are your thoughts?

zoning purgatory

June 9, 2009

UGH!!!! We're in a BIG zoning mess! I don't know what we're doing. Newton just made an "oops" when changing the permit/zoning process 2 months ago. We're stuck in limbo land. The board knows this was a bad decision but unfortunately any town fix can take months. We thought we were pulling permits this week! I was at a town meeting last night until 11 pm with everyone agreeing this issue was not well thought out before becoming a zone requirement. (FAR - floor area ratio - it effects people on small lots with big house. Franklin community is very hard hit - 20 - 40% of the houses in this area couldn't add on a mudroom!) Our limits are .35 and we're sitting at that point now. We want to add 200 sq. ft = .015. The house next door has a FAR of .75!

We need to get a special permit for our bump outs which can take a few months on the short end. If the aldermen change the FAR requirements we won't need a special permit. I just got off the phone with our contractor. We will come up with a definitive plan tomorrow but at this point I think we will hold off until Sept before we go any farther. One work around was to start downstairs in July (bathrooms, staircase, doorways, etc.) and hopefully get the required permits before they finished. Another plan is to take out the heating and windows on our enclosed porch and hope the FAR numbers work. An issue for our contractor was that he may not be available in fall. He will get back to me tomorrow on it but he just called my architect about the latter plan when I thought we had a plan to start in Sept. UGH!!!

Our HVAC contractor drained the 1st floor radiators yesterday. Today they were to take out the pipes in the basement. I have put him on hold. He was trying to get the guy on the phone to tell him to stop. He hasn't reach him yet. I'm guarding the house and won't let him enter. Right now there's no heat available downstairs. I would hope they don't need any heat this summer.